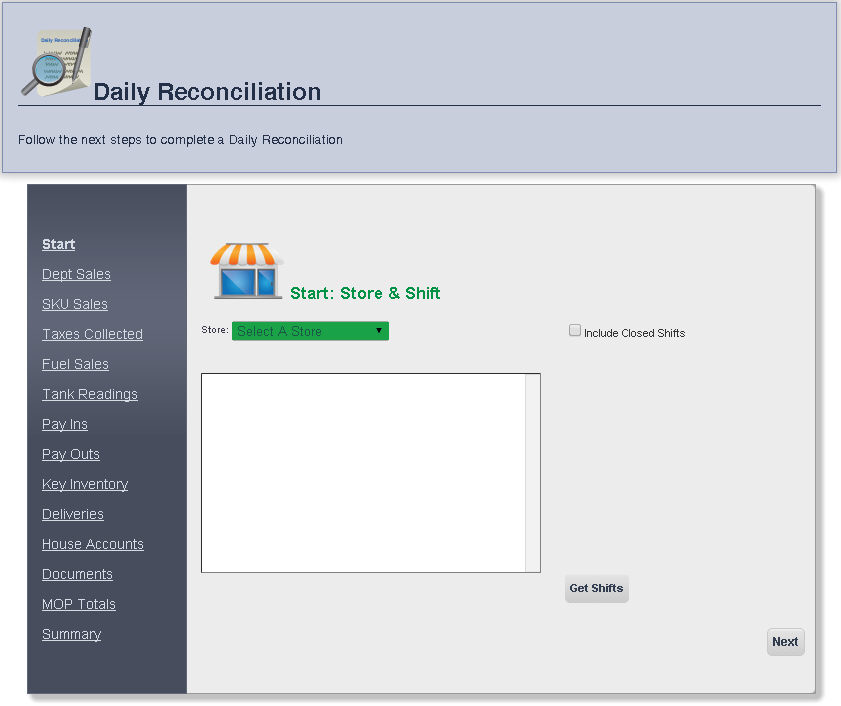
The Daily Reconciliation Page allows you to view a complete shift summary at a particular store.
1. From the Main Toolbar, select Admin, then Invoice, then click Daily Reconciliation.
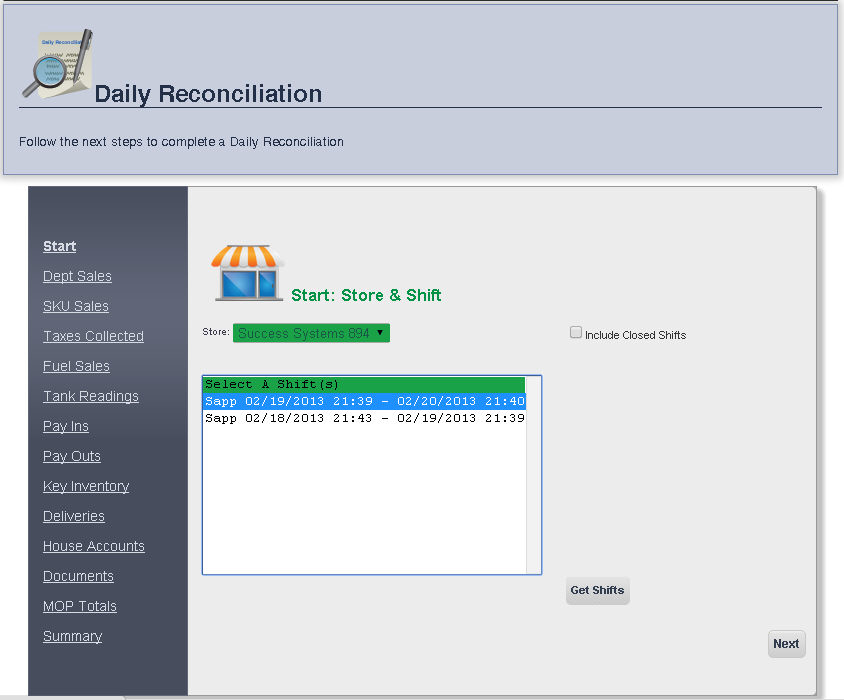
2. Select the store you would like the daily reconciliation for from the Store drop down menu.
3. Select the shift you would like the daily reconciliation for from the Window and click on the Get Shift button.
4. When you are finished, click Next, or click the link to any daily reconciliation page.
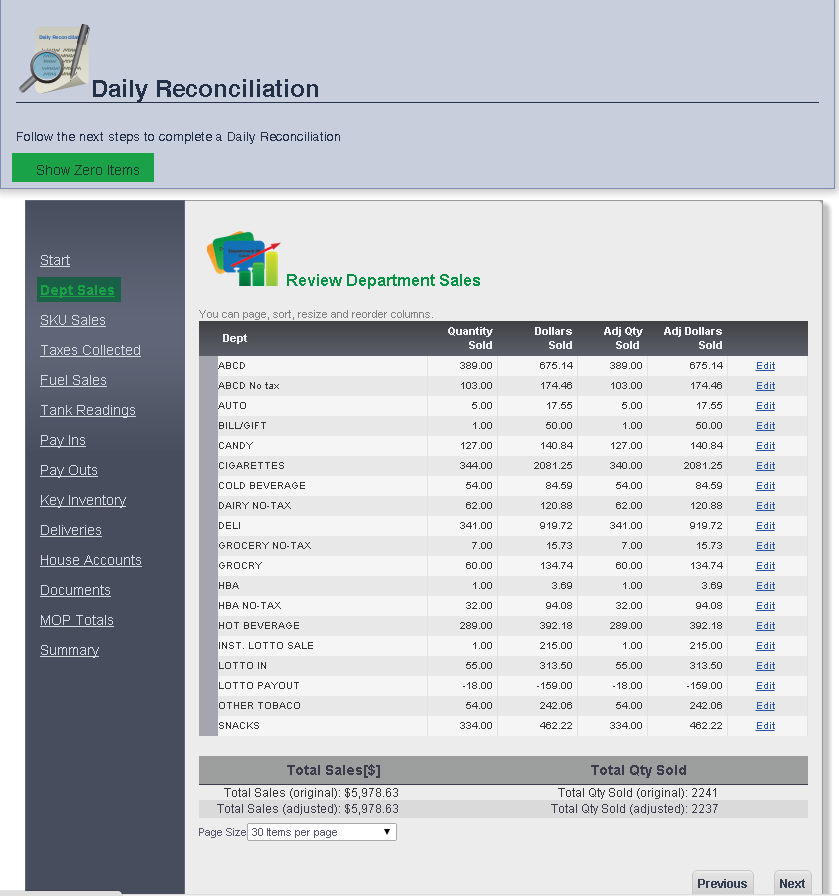
All of the shift's sales, and the quantity sold, and dollars sold, will appear grouped by department.
The total Dollars Sold, and total Quantity Sold for the entire shift will also appear at the bottom of the screen.
You can right click a department to Go To Department Price Change.
You can Adjust Quantity Sold and Adjust Dollars Sold for the department by clicking Edit next to that department. When you are finished making adjustments, click Update.
To display the departments that have no sales check the box at the top left of the screen that says Show Zero Items
To move to the SKU Sales Page, click Next.
SKU Sales Page
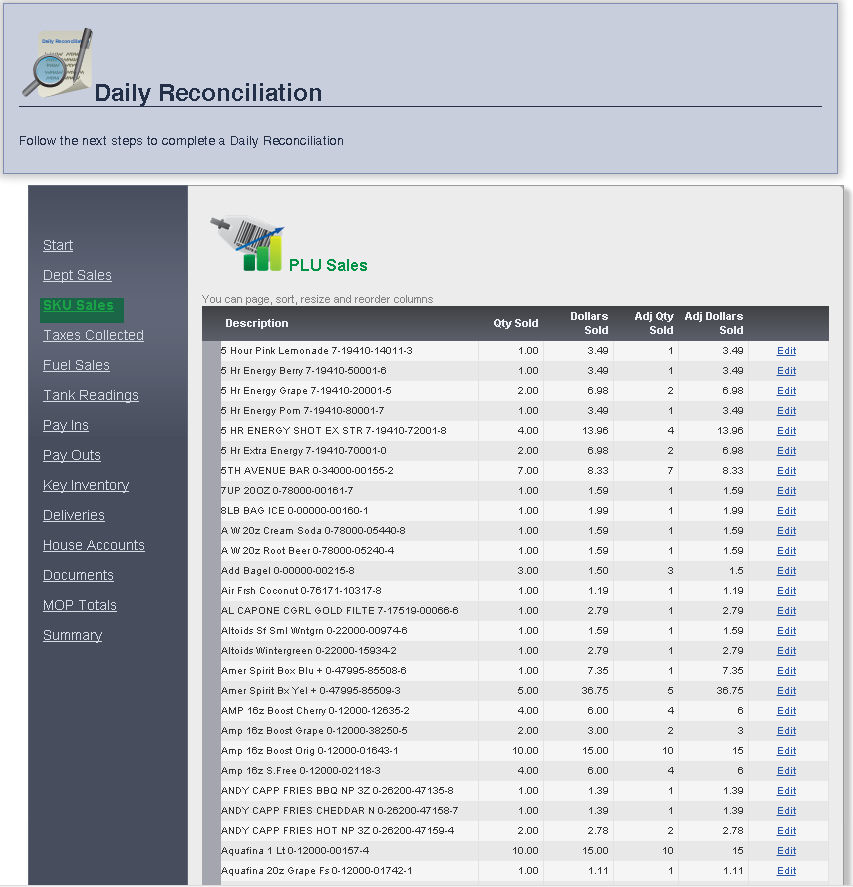
All of the shift's sales, and the quantity sold, and dollars sold, will appear grouped by SKU.
The total Dollars Sold, and total Quantity Sold for the entire shift will also appear at the bottom of the screen.
You can right click an item to Go To Main Editing Screen .
You can Adjust Quantity Sold and Adjust Dollars Sold for the item by clicking Edit next to that item. When you are finished making adjustments, click Update.
To move to the Taxes Collected Page, click Next.
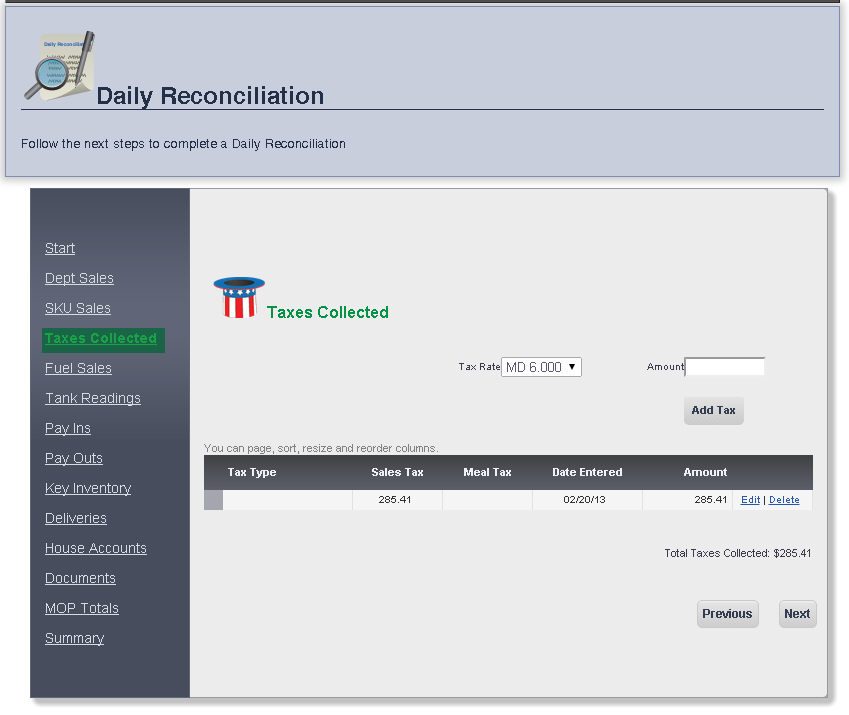
The taxes collected for that day will be displayed, sorted by Tax Type.
You can edit the tax amount by clicking Edit next to that Tax Type. When you are finished, click Update.
You can also add a tax by selecting the tax rate from the Tax Rate drop down menu, and then entering the amount to be taxed in the Amount text box. To add that tax to the Tax Type list, click Add Tax.
To proceed to the Fuel Sales page, click Next.
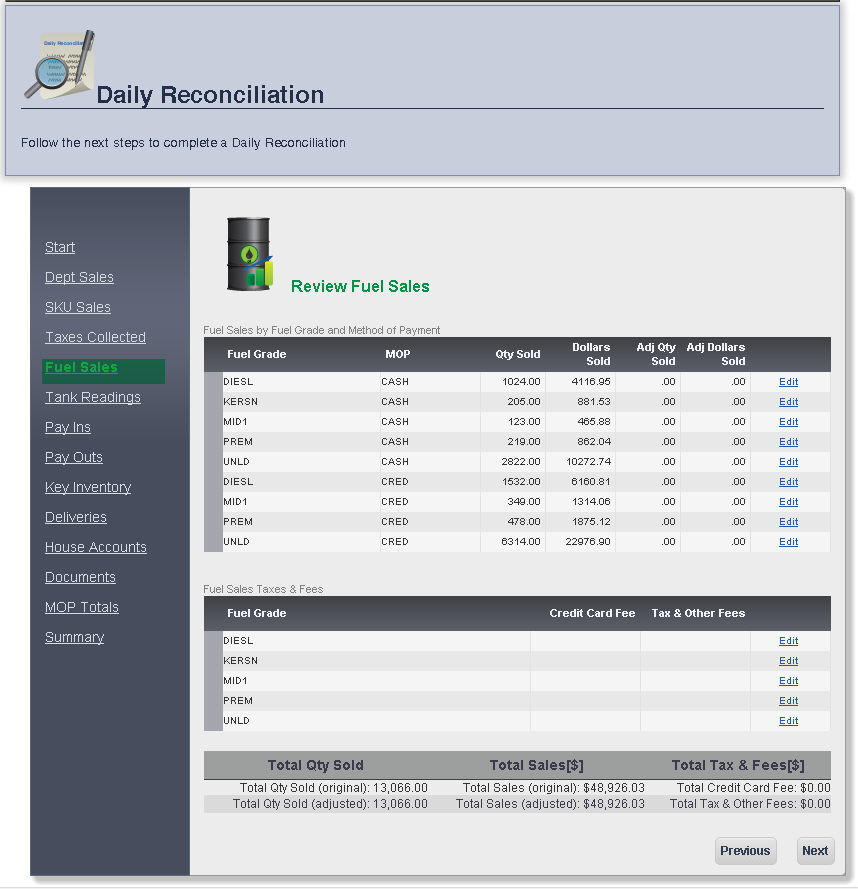
The Fuel Sales for that day will be displayed, sorted by Fuel Grade.
The method of payment, cash or credit, will be displayed under MOP
The total Sales, and total Quantity Sold for the entire shift will appear at the bottom of the screen.
You can edit the quantity sold and dollars sold by clicking Edit next to the Adj Dollars Sold. When you are finished, click Update.
To proceed to the Tank Readings page, click Next.
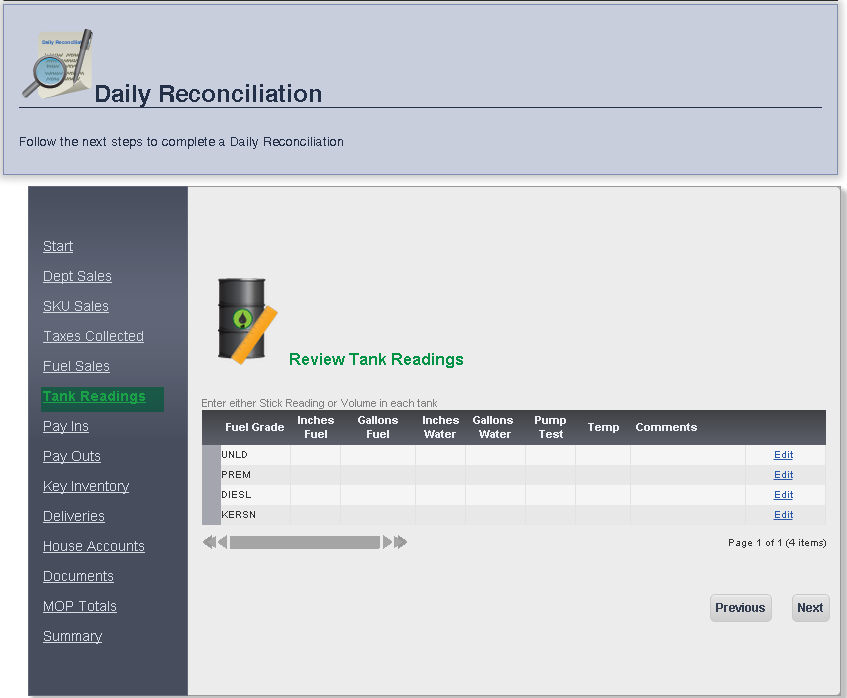
The Tank Readings for that day will be displayed, sorted by Fuel Grade.
The Inches Fuel, Gallons Guels, Inches Water, Gallons Water, Pump Test, Temp and Comments can all be changed using the Edit button. When you are finished with each column, click Update.
To proceed to the Pay Ins page, click Next.
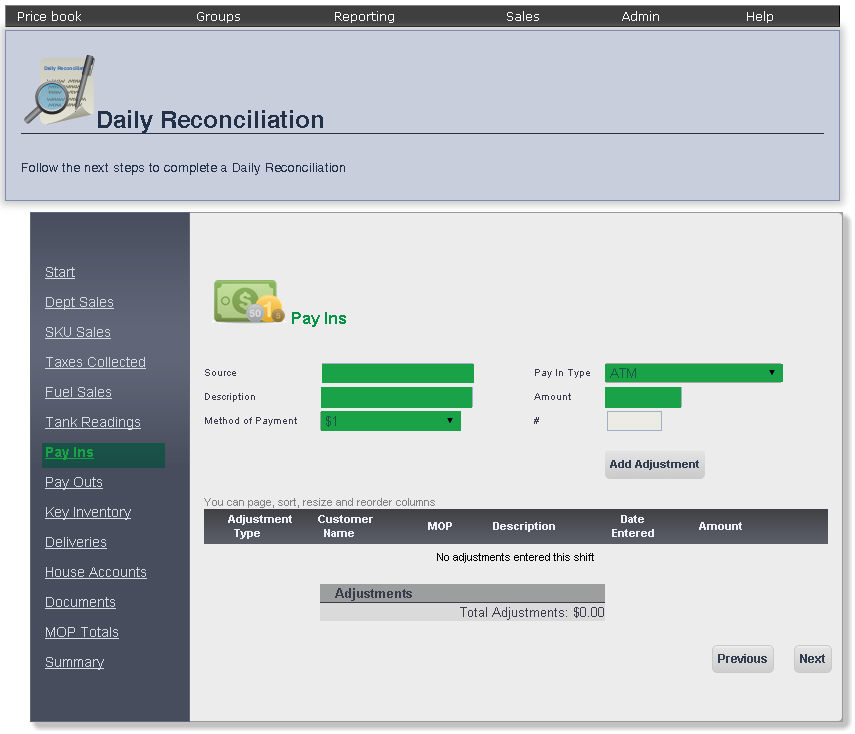
The Pay Ins page allows you to enter and adjust any payments that came into the register that are not included as a part of sales.
To add a new adjustment, enter the Source (commonly the customer name), Description, Amount into their appropriate text boxes, and select the Method of Payment, and Pay In Type from the appropriate drop down menus. When you are finished, click the Add Adjustment button.
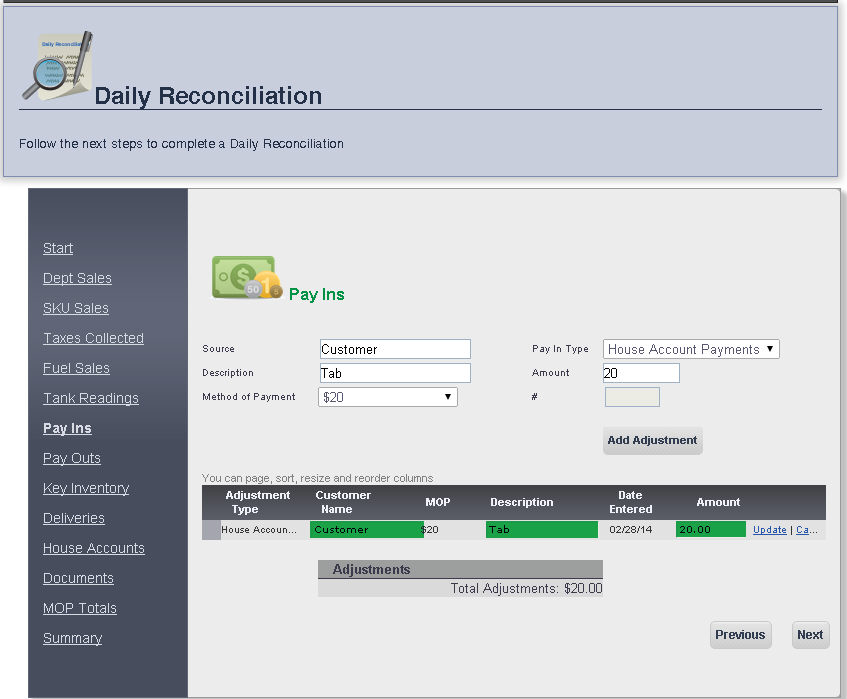
You can edit an adjustment's Customer Name, Description, and Amount by clicking Edit next to that adjustment. When you are finished clicking changes, click Update.
To proceed to the Pay Outs page, click Next.
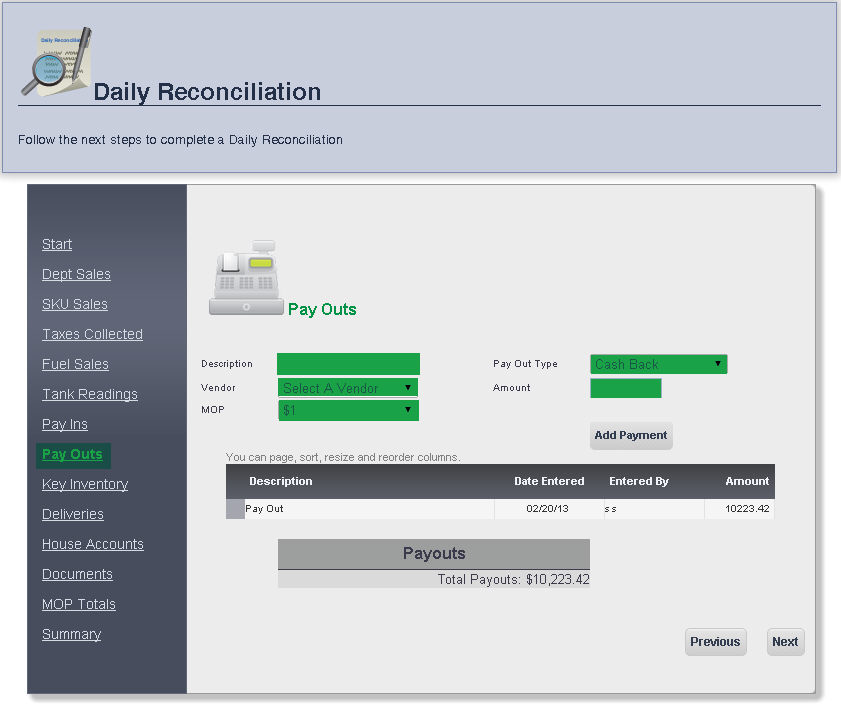
The Pay Outs page allows you to adjust pay outs made from the register during the shift you are reconciling.
To add a payment, enter the Description of that pay out, and the Amount of the payment into the appropriate text boxes, and select the Vendor the payment is to, the Method of Payment (MOP) of the payment, and the Pay Out Type, from the appropriate drop down menus. When you are finished, click the Add Payment button.
To view the payment, right click the Pay out under Description.
To proceed to the Key Inventory page, click Next.
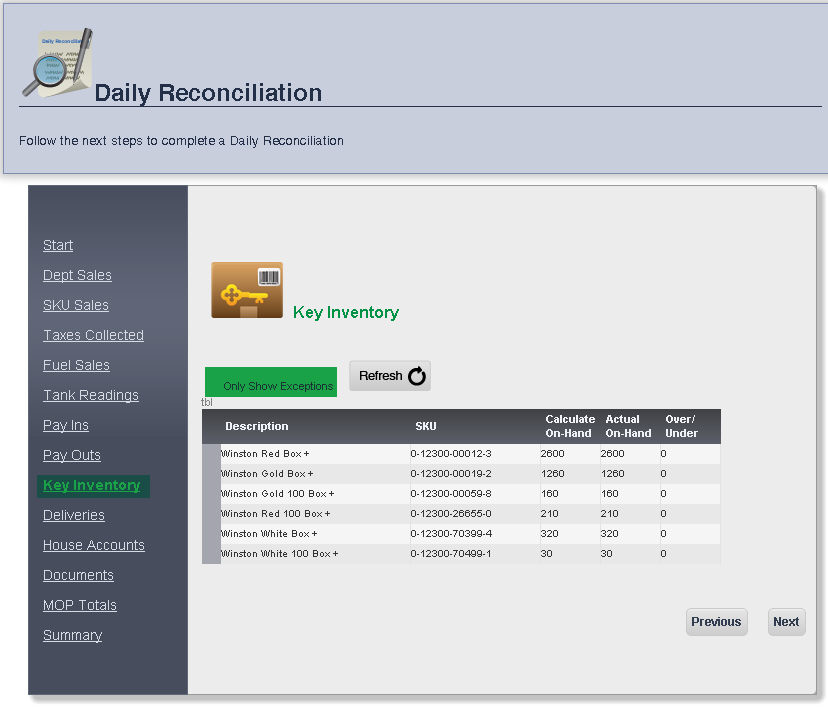
The Key Inventory Page keeps track of specific items, and shows you the SKU, Calculated On-Hand inventory, Actual On-Hand inventory and Over-Under, which shows the discrepancy between the calculated inventory and the actual inventory of the item.
To display only the items with exceptions, check off the Only Show Exceptions box at the top left of the screen.
To proceed to the Deliveries page, click Next.
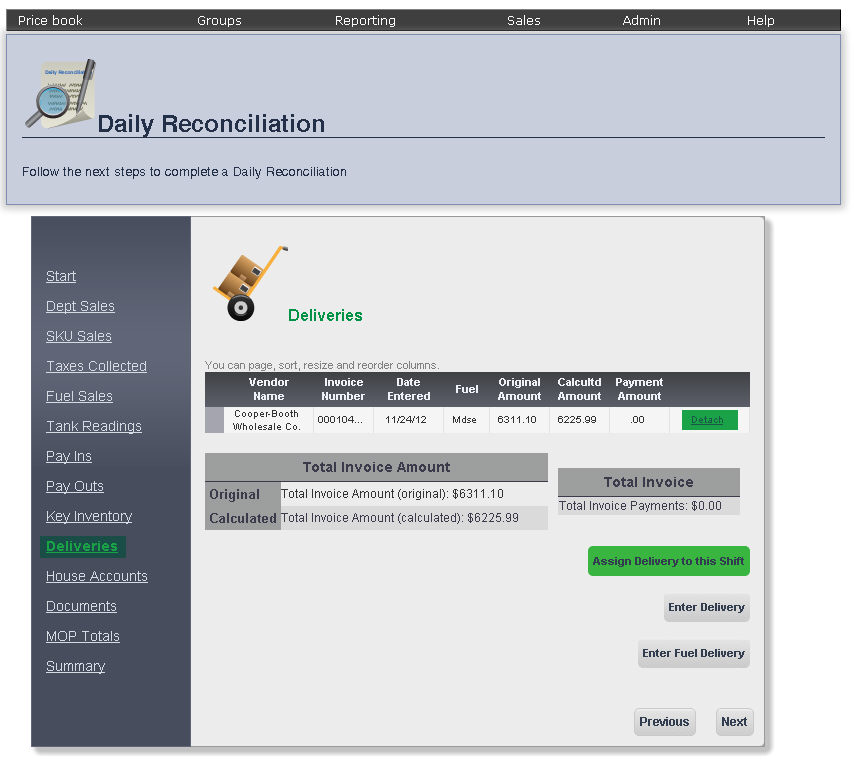
The Deliveries page allows you to view the scheduled deliveries for the shift that you are viewing the daily reconciliation for.
The Vendor Name, Invoice Number, Date Entered, Fuel, Original Amount, Calculated Amount, and Payment Amount for the vendor making the delivery will be displayed.
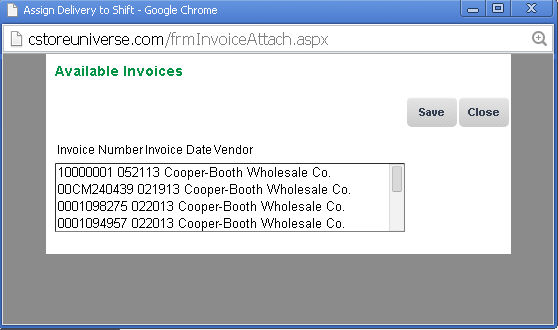
To add a delivery to that shift, click the Assign Delivery to this Shift button. Select the vendor from the list by clicking it, then click the Save button.
You can remove a vendor from the list by clicking Detach next to that vendor.
To proceed to the House Accounts page, click Next.
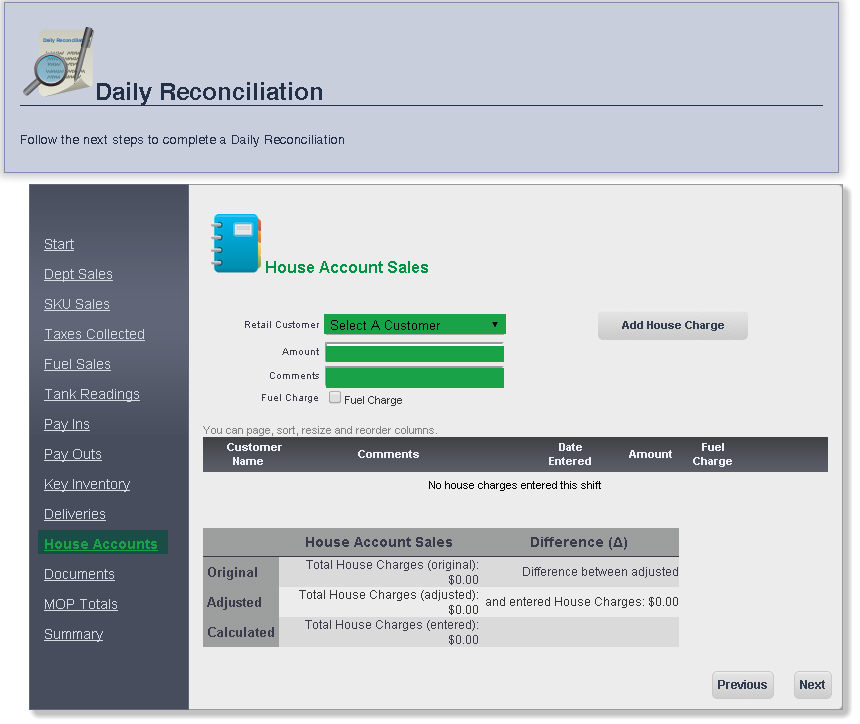
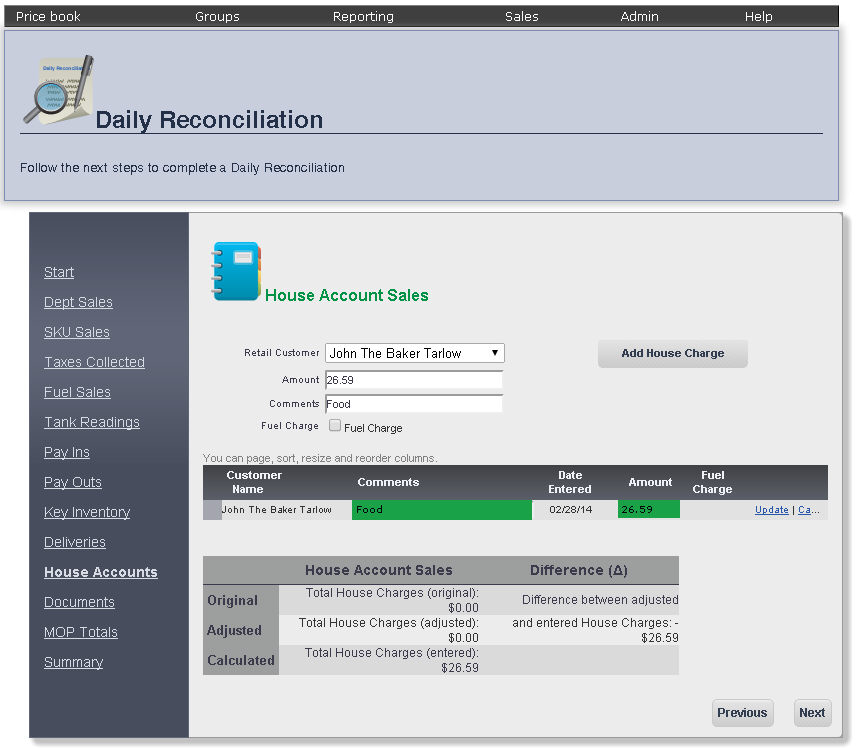
The House Accounts page allows you to track customer's in-store accounts.
To add a charge to a house account, select the customer you would like to add an account for from the Retail Customer drop down menu, and enter the amount that customer charged to his or her house account in the Amount text box. If you have any comments, you may enter them in the Comments text box, and if the customer is adding a fuel charge to his house account, check the box next to Fuel Charge by clicking it.
You can edit the Amount of the charge and your Comments by clicking Edit. When you are finished, click Update.
To proceed to the Documents page, click Next.
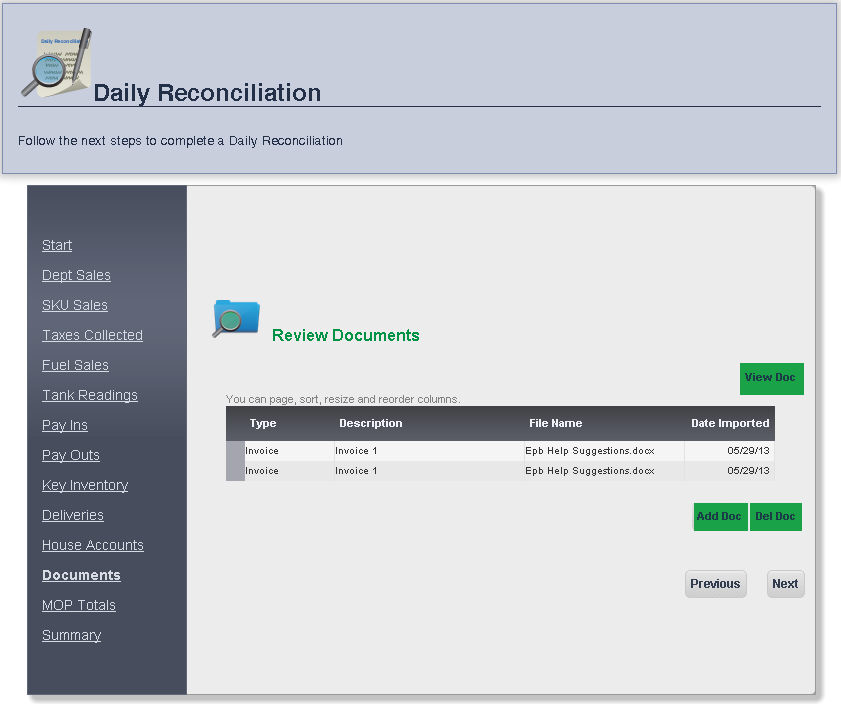
The Documents page allows you to upload Invoices, Receipts, Shift worksheets, Timesheets and other documents to specific shifts.
To Add a Document click the Add Doc button at the bottom right of the page, and a pop up window will appear.
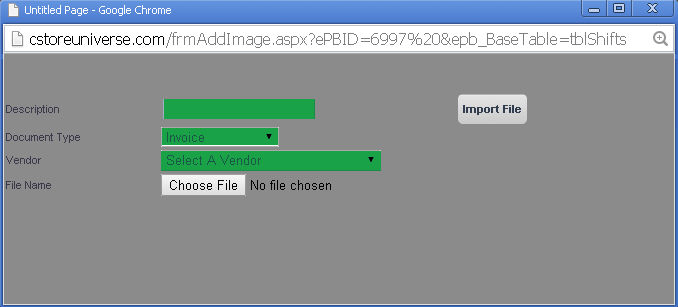
Fill in the Description, Document Type and choose a File to upload, then click Import File to add the document.
To view a document that you uploaded, click the View Doc button located on the right of the screen. The document will open in a separate application at the bottom of the screen.
To delete a document, click the Delete Doc button to the right of the Add Doc button
To proceed to the MOP Totals Page, click Next.
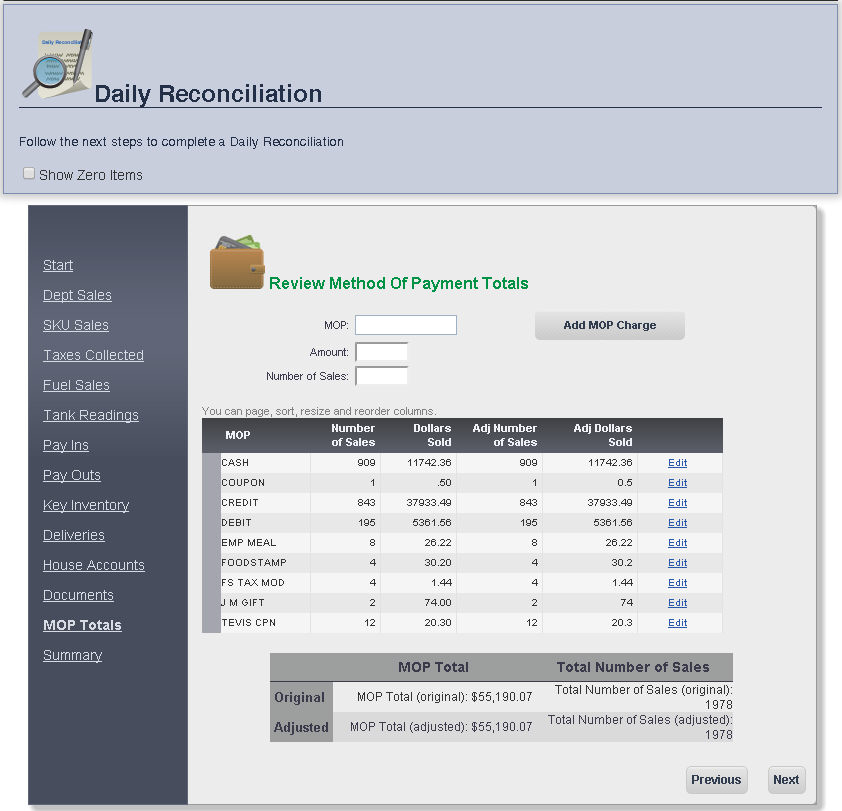
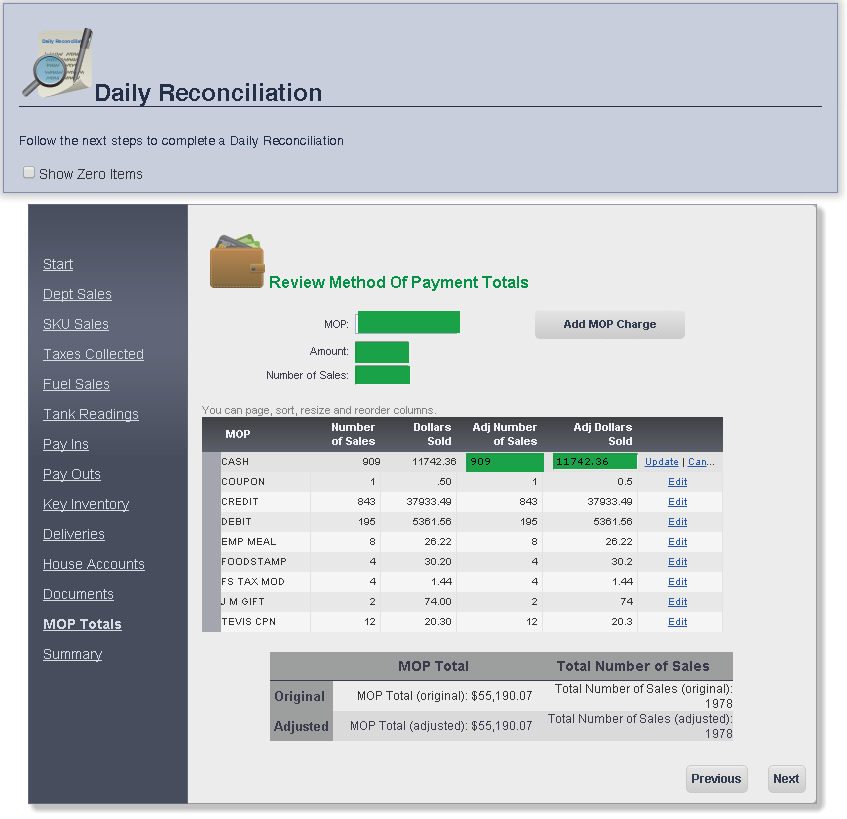
All of the payments for that shift, including the Number of Sales and the Dollars Sold, will be displayed sorted by Method of Payment (MOP).
The Method of Payment Totals, as well as the Total Number of Sales will also appear at the bottom of the screen.
You can right click a method of payment to go to Method of Payment page.
You can adjust the Number of Sales and Dollars Sold for a method of payment by clicking Edit next to that method of payment. Click Update to save any changes.
To view MOP's with zero sales, check the Show Zero Items box at the top left of the page.
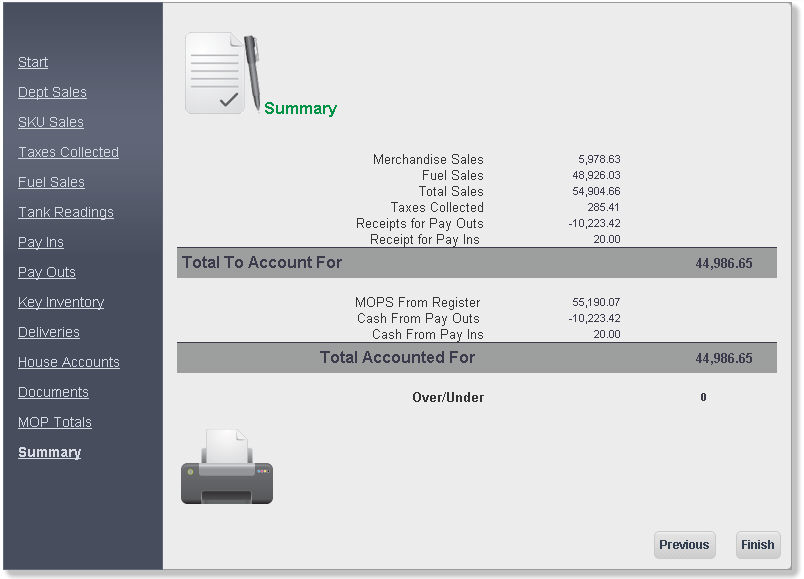
To proceed to the Summary Page, click Next.
frmDailyReconciliation.aspx